Suzanne's Table

Suzanne's Table

Category Archives: Cooking

Rice Noodles with Hoisin Meatballs

24 Saturday Nov 2018

Posted by kristiwidgery in Cooking, Home Cook

≈ Leave a comment

Tags

Asian food, Meatballs, Rice noodles

IMG_20181119_194925_889


Last week I realized eighteen months have passed since I last posted on Suzanne’s table.  I didn’t stop cooking and I haven’t stopped thinking of ideas.  I thought I should change sites, themes, the list goes on. I could come up with hundreds of reasons why I haven’t been updating this site, but today I said “no more excuses.”

If you are Facebook or Instagram friends with me, you know I post pictures of almost everything I cook. I have been getting so many requests for those recipes, I am going to be sharing them here.

Please let me know if you try any of my creations or have ideas of how to improve upon them.

I have eliminated red meat from my diet, so hard! I still drool over food pictures of large juicy burgers and steaks.  I have adapted many of my meals to substitute another ground meat for beef, feel free to use any ground meat you prefer for this dish or any I post that have ground meat in them.

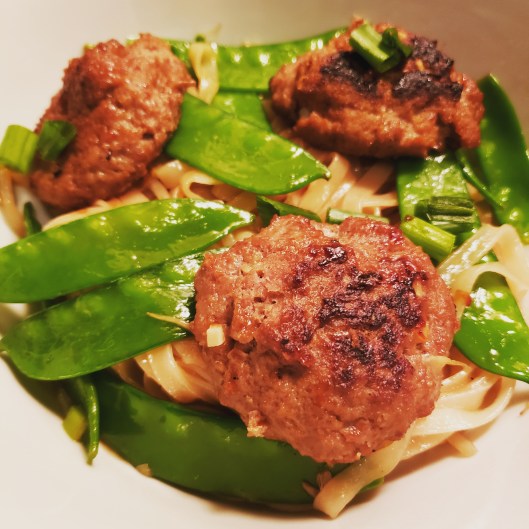
This meal took me under an hour to prepare.  It is a quick weeknight dinner full of flavor.

Rice Noodles with Hoisin Meatballs and snow peas

1 pound of ground meat

3 tablespoons of hoisin sauce

3 cloves of garlic, chopped

1 tablespoon plus 2 teaspoons minced ginger

½ teaspoon Salt

¼ teaspoon pepper

8 ounces dried rice noodles

2 tablespoons and 2 teaspoon sesame oil (vegetable oil can also be used, I just like the flavor sesame oil gives your food)

2 tablespoons of oyster sauce

2 green onions, sliced thin

1 cup snow peas

Preheat oven to 350 degrees.  Line baking pan or sheet with foil.

Mix ground meat, ¼ cup water, 2 tablespoons hoisin, 1 chopped garlic clove, salt and pepper.  Form meatballs, depending on the size you should end up with 8-12. Arrange on baking pan and bake for approximately 15 minutes.  Turn once so they are browned on both sides.  For a crispier meatball you can put under the broiler for 2 minutes.

While meat is cooking, prepare noodles according to package directions.  Rinse noodles and toss with 1 teaspoon of oil to keep them from clumping together.  Next mix together 1/3 cup water, oyster sauce, 1 teaspoon sesame oil and 1 table spoon of hoisin.

Heat a large skillet with 2 tablespoons of oil, once oil is hot, toss in remaining 2 cloves of garlic, 2 teaspoons of ginger, green onion and snow peas.  Stir fry until snow peas are bright green, about 1-2 minutes.  Add noodles to pan and toss.  Pour sauce mixture over noodles and toss until sauce is absorbed, about 2 minutes.  Divide noodle mixture and meatballs among bowls.

Note:  if you aren’t used to cooking with hoisin or oyster sauce you don’t need to go to a special market to find it.  Most grocery store chains carry these in the Asian section of the store.  You can also use any type of noodle with this dish.  I just love rice noodles more than any other type.

Share this:

  • Click to email a link to a friend (Opens in new window) Email
  • Click to print (Opens in new window) Print
  • Click to share on Facebook (Opens in new window) Facebook
  • Click to share on X (Opens in new window) X
  • Click to share on Tumblr (Opens in new window) Tumblr
  • Click to share on Pinterest (Opens in new window) Pinterest
Like Loading...

Chocolate Chip Puffs

08 Monday May 2017

Posted by kristiwidgery in Cooking, Home Cook

≈ Leave a comment

Tags

baking, Chocolate chip cookie

Chocolate chip cookies have played many roles in my life.  I grew up on a golf course, and for years every summer there would be a PGA tournament in August.  I am not sure where the idea came from, but one summer the neighbor down the street and I decided to sell lemonade and cookies.  I was 11 and my neighbor friend was 8.  We charged $1 for a giant chocolate chip cookie and $1 for a lemonade.  My grandmother baked 100’s of these giant chocolate chip cookies,  they were at least 5 inches in diameter, and the mother of my friend made gallons of country time lemonade. We worked our stand for 7 days and made about $1000.  It was pure profit for us, our families did not ask to be reimbursed for the supplies.  I think that they thought it was good for us to get out of the house and have a project.  For a kid, I thought I was rich, immediately I asked my dad to drive me to the mall to spend my fortune. In fact,  I still have the Coach purse I bought with part of my proceeds from that first cookie stand. We did this for two more summers and then the tournament banned anyone from selling along the golf course.

Personally,  I started making chocolate chip cookies in my teens to get the attention of the boy down the street.  I would call him up to tell him I was making cookies and he would show up at the door minutes later.  He would eat more of the raw dough than the baked cookies.

For years I hadn’t baked a cookie but when I married Brian, I would occasionally bake a batch of chocolate chip cookies, he likes them soft and almost underbaked.   I had found that they were just the consistency he likes when they were hot out of the oven but as they cooled they hardened and he was no longer interested in them.

I set out to find an alternative to a soft chocolate chip cookie and after doing some research I came up with the following recipe.  They look like a puffy, toasted ball and they stay soft long after they have cooled.  They have not lasted for more than a day in my home so I can’t say what kind of shelf life they have.  They also have a third less fat than a regular chocolate chip cookie.

20170508_163236

Chocolate Chip Puffs

2 1/3 cups all-purpose flour

1 tsp. baking soda

1 tsp. salt

1 8- oz. package cream cheese

3/4 cups brown sugar

3/4 cups granulated sugar

2 tsp. vanilla extract

2 large eggs

1 1/2  cups semisweet chocolate chips

Preheat oven to 375 degrees

In a small bowl, mix together dry ingredients and set to the side.  In large mixing bowl, add the cream cheese and sugars, mix until creamy.  Add in eggs, one at a time until thoroughly mixed.  Add in vanilla.  In small increments add dry mixture until well combined and then fold in chocolate chips. Place spoonfuls of dough, about 1 1/2 inches apart on ungreased cookie sheet.  I like to line mine with parchment paper for an easier cleanup.   Bake for 9 minutes.  Cookies will look toasted but not a deep color like you would normally see with chocolate chip cookies.  Makes about 3 dozen.

(Recipe originally found on Delish.com)


Share this:

  • Click to email a link to a friend (Opens in new window) Email
  • Click to print (Opens in new window) Print
  • Click to share on Facebook (Opens in new window) Facebook
  • Click to share on X (Opens in new window) X
  • Click to share on Tumblr (Opens in new window) Tumblr
  • Click to share on Pinterest (Opens in new window) Pinterest
Like Loading...

Sour Cream Pound Cake with Lemon Glaze

18 Tuesday Apr 2017

Posted by kristiwidgery in Cooking, Home Cook

≈ Leave a comment

Tags

baking, Lemon Glaze, Sour Cream Pound Cake

Today is my birthday and I am thinking about birthday cakes.  My friends sent sweet messages wishing me a happy birthday, more than one person said they hoped I didn’t have to bake my own birthday cake.  As great as my mother and grandmother were in the kitchen I can’t remember one homemade birthday cake ever.  There is a picture of my first birthday and my grandmother placing a cake in front of me, it looks homemade, but of course, I don’t remember any of it.  The only birthday cakes I remember are those from my late 20’s on, my mother used to call my favorite bakery in Chicago and have them deliver some decadent creations to work.  It made me very popular for a few years, as there was cake to feed dozens.  There was a great deal of disappointment amoung my co-workers when I told my mom I really didn’t need a giant cake for my birthday.  The two cakes that stand out most are the last two cakes I ate on birthday’s past.  For my 2013 birthday, Brian and I met my parents for a birthday lunch at the halfway point between Chicago and their home in Michigan. My dad got out of the car with a giant cake box, it was one of those super sweet sugary frosting cakes you get at the grocery store.  There were four of us and that cake could have fed the entire restaurant.  The second cake that stands out in my mind is my birthday in 2014. Again it was a sugary frosted cake in a large box.  We were in Michigan for the Easter holiday, my dad had passed on the summer before, thankfully my sister and her husband were visiting from Texas, but my dad’s presence was missed. I have not eaten birthday cake since then. 

If I were to make a cake for myself today it would be my grandmother’s Sour Cream Pound Cake.  Growing up she baked this cake on a regular basis. This cake was the first cake I started making when I moved out on my own.  It is my go-to cake and the easiest cake to make, in fact, it is the easiest thing I bake overall.  You just toss everything into one bowl, mix and pour into a bundt pan.  Over the years I have made a few changes to my grandmother’s recipe, adding a lemon glaze.   I have been sharing my baked goods with friends and family, this cake is the one that is requested on a regular basis. One friend told me he could eat it more than once a week. 

SCPC 1

Sour Cream Pound Cake with Lemon Glaze 

Preheat oven to 325

Makes one 10-inch ring cake

Batter:

2 1/4 cups All-purpose flour

1/2 tsp Baking Soda

1 Cup Butter softened

3 Eggs

2 Cups Sugar

1/2 tsp Salt

1 Cup Sour Cream

1 tsp Vanilla

Glaze:

2 Cups Confectioners sugar

1/2 Cup Lemon juice

2 tbsp Butter

Note:  you can make this cake without the glaze and it will still be delicious

Cake: Generously grease a 12 cup fluted bundt cake pan, I like to use the Pam baking spray, but you can also use 1 tbsp of solid shortening and a little flour

In a large bowl, blend all the ingredients until moistened.  Pour batter into prepared pan. Bake at 325 degrees for 55 minutes or until a toothpick inserted comes out clean.  Cool to lukewarm; invert onto serving plate.

Glaze: Using a double boiler,  mix confectioners sugar, lemon juice and butter.  Heat until sugar dissolves and the mixture is smooth.  You can also heat in microwave at 30-second intervals stirring between each 30-second interval.  Spoon evenly over the cake. Let sit for a few minutes before serving

SCPC 2

Share this:

  • Click to email a link to a friend (Opens in new window) Email
  • Click to print (Opens in new window) Print
  • Click to share on Facebook (Opens in new window) Facebook
  • Click to share on X (Opens in new window) X
  • Click to share on Tumblr (Opens in new window) Tumblr
  • Click to share on Pinterest (Opens in new window) Pinterest
Like Loading...

Day Twelve-Suzanne’s Table Twelve Days of Cookies: Peanut Butter Fudge

22 Thursday Dec 2016

Posted by kristiwidgery in Cooking, Home Cook

≈ Leave a comment

Tags

candy, fudge, holiday cooking, peanut butter fudge

My oven and mixer have been working overtime this past week, so I thought I would give them a break and share my mom’s peanut butter fudge recipe.  Brian, Kelly and I are getting ready to go visit my sister, Jenna and her husband Justin in Dallas for the Christmas holiday.  Jenna and I have been talking a lot over the past few months not only about Suzanne’s Table but also about what we wanted to do for Christmas.  Our mom passed on right before Christmas last year so neither of us really celebrated anything and we decided it was time to start our own holiday traditions.

We have been reminiscing while making plans for our upcoming Christmas dinner, about Suzanne’s tomato pudding and my favorite, her cheesy jalapeno grits.  Jenna was the one who remembered mom’s peanut butter fudge.  I could remember pan after pan of the chocolate fudge, but not this one. For most my life I was not a fan of anything peanut butter, so I think that is why I must have blocked it out, it is only recently I have acquired the taste for peanut butter.

I decided to wait till day 12 to make the peanut butter fudge so I could take it to my sister, however, after tasting it, I am not sure if it will make it there, we may eat it all on the drive down.


20161222_011712

Peanut Butter Fudge

You will need a candy thermometer for this recipe

1 cup granulated sugar

½ cup half and half

¼ cup butter or margarine

½ cup marshmallow cream

1 cup light brown sugar, firmly packed

2 tbsp light corn syrup

½ cup peanut butter

2 tsp vanilla

Before starting to cook, butter an 8-inch square pan.  In a large pot, combine sugars, half and half and corn syrup. Cook over low heat, stirring gently until sugar dissolves.  Raise to medium heat and cover pot fo 3 minutes to wash sugar crystals down from the side of the pot.  Uncover and place the candy thermometer in the pot, and cook to soft ball stage (235 degrees), stirring occasionally.

20161222_011752

When mixture reaches 235, remove from heat and add in butter, peanut butter, marshmallow cream and vanilla.  Stir until smooth. Pour into your prepared square pan. When cool cut into squares.  Makes about 1 ½ pounds.

Share this:

  • Click to email a link to a friend (Opens in new window) Email
  • Click to print (Opens in new window) Print
  • Click to share on Facebook (Opens in new window) Facebook
  • Click to share on X (Opens in new window) X
  • Click to share on Tumblr (Opens in new window) Tumblr
  • Click to share on Pinterest (Opens in new window) Pinterest
Like Loading...

Day Eleven-Suzanne’s Table Twelve Days of Cookies: Chocolate Crinkles

21 Wednesday Dec 2016

Posted by kristiwidgery in Cooking, Home Cook

≈ Leave a comment

Tags

baking, chocolate cookies

There are so many favorite recipes in both Suzanne’s Table and my grandmother’s cookie book that I am sure I could keep posting about cookies for weeks, but as every good cook knows you have to taste along the way and keep tasting to make sure whatever you are making tastes delicious. I swear I have gained 5 pounds since this started.  This past week and a half I have enjoyed recreating and sharing my family memories but once the holidays are over I want to start talking about all the other wonderful recipes that mean something to me, but baking will always be a part of this project, just not cookies for awhile.

I am sure at some point some of you have come across a chocolate crinkle recipe.  They are quite popular, I have seen variations of this cookie with red velvet, mint, and lemon just to name a few.  Kelly told me they remind her of a snowflake.  To quote her, “Kristi they remind me of delicious chocolate snowflake if there were such a thing as delicious chocolate snowflakes.”  Of course, these cookies always made an appearance on the holiday cookie platters my grandmother put together, but I remember them for another reason.  While I was away at college, I would receive a package in the mail every few months from my grandma. These boxes would be filled with cookies, and sometimes with other hidden surprises ($$$), knowing how much I loved chocolate crinkle cookies, they were always inside. There would always be a sweet note from my grandma telling me how much she missed me and there would be enough cookies to feed my entire dorm. It is because of these memories that this recipe made the list of twelve.

20161219_160551

Chocolate Crinkles

Preheat oven to 360 degrees

1/2 cup vegetable oil

4 eggs

2 cups all-purpose flour

1/2 tsp salt

4 oz melted unsweetened chocolate

2 cups granulated sugar

2 tsp vanilla

2 tsp baking powder

1 cup confectioners sugar

* Chill mixture several hours or overnight before baking (I only waited 3 hours)

Mix oil, melted chocolate and granulated sugar in large bowl, blend in eggs, 1 at a time until well mixed.  Add vanilla.  Stir in flour, baking powder and salt into wet mixture. Cover and chill.  Roll dough into balls, about a teaspoon full, and roll in confectioners sugar. Place balls on greased or parchment covered baking sheet.  Bake 10-12 minutes. Makes six dozen.


Share this:

  • Click to email a link to a friend (Opens in new window) Email
  • Click to print (Opens in new window) Print
  • Click to share on Facebook (Opens in new window) Facebook
  • Click to share on X (Opens in new window) X
  • Click to share on Tumblr (Opens in new window) Tumblr
  • Click to share on Pinterest (Opens in new window) Pinterest
Like Loading...

Day Nine- Suzanne’s Table Twelve Days of Cookies: Edible Holiday Wreaths

19 Monday Dec 2016

Posted by kristiwidgery in Cooking, Home Cook

≈ 1 Comment

Tags

Christmas cookies, cooking with kids, corn flakes, kid friendly recipe, marshmellow

When my husband Brian and I got married, I became step-mom to Kelly.  Brian and Kelly like to go fishing and hiking together, two activities I prefer to skip out on, so over the years Kelly and I have found our own common interests. Kelly lives with her mother most of the time, but when she spends time with us I like to have fun projects for us to do, many of them involve spending time in the kitchen. Kelly just turned 10, but she has been helping me in the kitchen since she was 5. We started with small tasks, but this past summer she successfully made quite a few recipes with little help from me.  She is great at chopping vegetables, with even more precision at making even cuts then mine tend to be.

Kelly arrived last night to spend winter break with us. She and I started talking about cookies and she immediately wanted to go to the kitchen and start creating. I chose a simple recipe that she could do on her own with my supervision.

This recipe is very similar to making a rice krispie treat, with a holiday twist.  It is easy to put together and last night Kelly made our wreaths from start to finish.  All I did was read the steps to her and made sure she was careful around the stove. If you are looking for a fun project with your kids over winter break, this one is fun.


20161218_224345

Edible Wreaths

1/2 cup butter

1 1/2 tsp green food coloring

4 cups of cornflakes

40 large marshmallows

3 drops of mint extract (optional)

3 tbsp cinnamon red hot candies

Before you start cooking, line counter top with wax paper and spray with non-stick cooking spray.


20161218_220502

I had Kelly pre-measure everything she would need to make her wreaths


20161218_220622
20161218_220543


Using a large sauce pan,  begin to melt butter over low heat when melted add in marshmallows,  stir constantly until marshmallows are completely melted.  Remove from heat and add in the mint extract (optional) food coloring and cornflakes.  Stir until thoroughly mixed.  Butter a small spoon and drop small mounds of cornflake mixture on waxed paper.  Lightly butter fingers and form cornflake mounds into wreaths with holes in the center.  Decorate with cinnamon candies.

20161218_220712

Share this:

  • Click to email a link to a friend (Opens in new window) Email
  • Click to print (Opens in new window) Print
  • Click to share on Facebook (Opens in new window) Facebook
  • Click to share on X (Opens in new window) X
  • Click to share on Tumblr (Opens in new window) Tumblr
  • Click to share on Pinterest (Opens in new window) Pinterest
Like Loading...

Day Seven- Suzanne’s Table Twelve Days of Cookies: Sugar and Spice

17 Saturday Dec 2016

Posted by kristiwidgery in Cooking, Home Cook

≈ Leave a comment

Tags

molasses cookies, Sugar and Spice cookies

On the inside cover of my grandmother’s cookie book, the page number for sugar and spice cookies was written down and there was a star next to it.  This same recipe made it into Suzanne’s Table cookbook. Growing up, the smell of fresh baked cookies wafted through our home on a daily basis, not just during the holidays.  If someone were to ask me to use words to describe cookies baking in the oven, my words would be home, family, and grandma.

Back in my single girl days living in Chicago, I rarely ventured into the kitchen to actually turn on my oven, but once in a while I would dust off my cookie sheets, and make a batch of something. Like her rolling pin, I also brought my granma’s cookie sheets when I moved to my first apartment. It has been 21 years since I started using them and I still use them today.  I have tried newer ones, but I just don’t get the same even results, I am convinced that some of her magic is infused into her cookies sheets and that is why I get the consistent results I do, or it could be that my skills have just improved over the years.

The cookie is basically a classic molasses cookie, with a fancier name. It is crunchy when you bite into it and soft on the inside.  I love the smell of cinnamon, cloves, and ginger as it is baking in the oven.  Looking outside at the snow covered trees and the expectation of more snow coming today, the smell of these cookies baking make me feel all warm and cozy.

20161217_133321


Sugar and Spice Cookies

Preheat oven to 375

1 cup brown sugar

1 egg

¾ cup shortening

¼ cup dark molasses

2 ¼ cup all-purpose flour

½ tsp salt

¾ tsp ground cloves

2 tsp baking soda

1 tsp cinnamon

¾ tsp ground ginger

¼ cup granulated sugar for dipping

In mixing bowl, combine the first 4 ingredients, mix until well combined then add in the remaining dry ingredients except for the granulated sugar.  Place bowl in the refrigerator to chill the dough.  I usually only wait about 15-20 minutes.  Roll cookies into balls about 1 ½ inch size and dip the top in the granulated sugar.

20161217_125104

Place sugar side up on greased cookie sheet (you can also line your sheet with parchment paper instead of greasing.) Bake for about 12 minutes.  Makes about 3 ½ dozen cookies.

Share this:

  • Click to email a link to a friend (Opens in new window) Email
  • Click to print (Opens in new window) Print
  • Click to share on Facebook (Opens in new window) Facebook
  • Click to share on X (Opens in new window) X
  • Click to share on Tumblr (Opens in new window) Tumblr
  • Click to share on Pinterest (Opens in new window) Pinterest
Like Loading...

Day Six- Suzanne’s Table Twelve Days of Cookies- Orange Drops

16 Friday Dec 2016

Posted by kristiwidgery in Cooking, Home Cook

≈ Leave a comment

Tags

cookies, holiday baking, orange cookies

Today I present Orange Drops.  My paternal grandmother was a southern woman,  born there and lived her entire life in the South.  She lived most of her life in Memphis, TN and eventually retired to Sarasota, FL. Every year she would send my dad a giant box of oranges shortly before Christmas.  My dad being a southern boy would spend hours working on those oranges to make a giant bowl of ambrosia salad.  It was his contribution to our Christmas dinner every year.  My Grandmother Effie would grab a bunch of those oranges and make her orange drop cookies.  They were one of my mom’s favorites.

As I have been making these family recipes, vivid images and memories have been floating in and out of my mind.  For example, talking about my dad’s ambrosia salad I can pictures the crystal bowls my mom pulled out every year for this one purpose.  The orange drops bring back memories of my mom and grandmother sitting down for a cup of tea to enjoy the first batch fresh of out of the oven.

Orange Drops

20161216_162833

Preheat oven to 400 degrees

Makes about 3 dozen

Cookie:

3/4 cup granulated sugar

2 tbsp grated orange peel

1 egg

1/2 tsp baking powder

1/2 tsp baking soda

1/2 tsp salt

2 cups all-purpose flour

1/2 cup orange juice

2/3 cup shortening

Mix all the dry ingredients together in small bowl and set aside. Mix sugar, shortening, orange peel, orange juice and egg together in large bowl. Slowly add in dry ingredients. Drop by rounded teaspoonfuls about 2 inches apart on un-greased baking sheet. Bake 8-9 minutes until edges are golden and cool.

While cookies are cooling, make the frosting.

Frosting:

2 cups confectioners sugar

1 tbsp grated orange peel

2 tbsp butter

2 tbsp orange juice

Mix all ingredients together until well combined and of spreading consistency.  If your mixture is still stiff add an additional tablespoon of orange juice. Spread over cooled cookies.


20161216_163132

I suggest leaving them on a cooling rack as the frosting hardens slightly, as you can see it can get a little messy


Share this:

  • Click to email a link to a friend (Opens in new window) Email
  • Click to print (Opens in new window) Print
  • Click to share on Facebook (Opens in new window) Facebook
  • Click to share on X (Opens in new window) X
  • Click to share on Tumblr (Opens in new window) Tumblr
  • Click to share on Pinterest (Opens in new window) Pinterest
Like Loading...

Day Five- Suzanne’s Table Twelve Days of Cookies: Double Chocolate Mint Bars

15 Thursday Dec 2016

Posted by kristiwidgery in Cooking, Home Cook

≈ Leave a comment

Tags

chocolate mint, double chocolate, layered cookie

For day five I am sharing my grandmother’s recipe for Double Chocolate Mint Bars.  To me, chocolate and mint are the perfect pairings.  Of course, that may have something to do with the fact that mint chocolate chip ice cream is my all-time favorite. However, I am a big fan of anything chocolate mint. This is a 3 layer cookie bar, the bottom layer is soft like cake, it has a green mint buttercream filling, followed by a melted chocolate top. If you aren’t a fan of green you can use any color food coloring you would like, or just use the golden butter cream as is.

This recipe is broken down into 3 parts, there is a baked chocolate layer, the festive buttercream layer and then the melted chocolate topping over the top.  It is a little time consuming because you have to chill the pan between each layer but I promise it is worth the wait.

Double Chocolate Mint Bars

Batter:

1 cup all-purpose flour

½ cup butter

16 ounces of chocolate syrup

1 cup sugar

4 eggs

In large bowl beat flour, sugar, butter, eggs and syrup until smooth.  Pour into prepared pan. Bake for 25-30 minutes, or until the top springs back when lightly touched. The top may still appear wet. Cool completely in pan before adding the mint cream layer.


20161215_205402

The spongy batter fresh out of the oven


Mint Cream layer:

2 cups confectioners sugar

½ cup butter

½ tsp mint extract or 4 drops of peppermint oil

1 tbsp water

Green food coloring (or whatever color you desire)

Combine all ingredients in small bowl and beat until smooth. Once batter layer is cool, spread over the top and chill again.

20161215_205700

Chocolate Topping:

6 tbsp  butter

1 cup mint or semi-sweet chocolate chips

Using double boiler melt butter and chocolate until mixture is smooth when stirred.  As an alternative to a double boiler, you can place in bowl and microwave on high in 1 ½ minute increments until melted and smooth.  Pour over the chilled pan and cut into small pieces and chill until ready to serve.

three


Share this:

  • Click to email a link to a friend (Opens in new window) Email
  • Click to print (Opens in new window) Print
  • Click to share on Facebook (Opens in new window) Facebook
  • Click to share on X (Opens in new window) X
  • Click to share on Tumblr (Opens in new window) Tumblr
  • Click to share on Pinterest (Opens in new window) Pinterest
Like Loading...

Day Four- Suzanne’s Table Twelve Days of Cookies: Brownies with Nutella Topping

14 Wednesday Dec 2016

Posted by kristiwidgery in Cooking, Home Cook

≈ Leave a comment

Tags

brownies, gooey brownie, nutella, toffee chips

Today I want to share with you one of my new favorites, Brownies with a Nutella topping.  I recently found this recipe and like I do with so many, I make slight changes to suit my tastes.

This brownie is not only rich and chocolaty but also slightly gooey.  I suggest keeping it in the pan until ready to serve as opposed to placing it on a cookie tray.  I always eat them with a fork.  I was asked to make something sweet for Thanksgiving this year, and rather than opting for the traditional pumpkin, pecan or apple pie, I thought chocolate would be a good route to take, and I was right, they were very well received.

20161124_135411

Brownies with Nutella Topping

Preheat oven to 350 degrees F. Line a 9 x 9″ baking pan with foil and lightly spray with nonstick cooking spray.

1 cup butter

2 cups granulated sugar

4 eggs

2 teaspoons vanilla extract

2/3 cup unsweetened cocoa powder

1 cup all-purpose flour

1/2 teaspoon salt

1/2 teaspoon baking powder

Topping:

1/2 cup Nutella

1 cup toffee bits (I buy the already chopped heath bar bits, you can find them in the aisle with chocolate chips)

To start, melt butter in a medium saucepan over low heat. Stir in sugar and remove from heat. Cool for 5 minutes.

While butter is melting, in small bowl mix together the dry ingredients and set aside

In large mixing bowl, place the sugar, once the butter is melted pour over the top of the sugar, allow butter-sugar mixture to cool for a few minutes.  Next, add eggs, one at a time, whisking until combined, then add vanilla extract. Once that is thoroughly mixed add the dry ingredients, add in small increments making sure the dry mixture is thoroughly mixed in.  The consistency should be shiny and there should be no flour streaks remaining. Pour into prepared baking pan. Bake for 28-33 minutes, bake for less time if you want a gooey brownie.

Remove from oven when done baking and while still warm evenly spread the Nutella over the brownies, follow by sprinkling the toffee chips over the top. Let cool completely before cutting and serving.  However, I rarely can wait that long and my first brownie is usually a clumpy mess of gooey chocolate yumminess.


Share this:

  • Click to email a link to a friend (Opens in new window) Email
  • Click to print (Opens in new window) Print
  • Click to share on Facebook (Opens in new window) Facebook
  • Click to share on X (Opens in new window) X
  • Click to share on Tumblr (Opens in new window) Tumblr
  • Click to share on Pinterest (Opens in new window) Pinterest
Like Loading...
← Older posts

Recent Posts

  • Apricot Chicken
  • Rice Noodles with Hoisin Meatballs
  • Chocolate Chip Puffs
  • Sour Cream Pound Cake with Lemon Glaze
  • Happy 2017 from Suzanne’s Table

Archives

  • November 2018
  • May 2017
  • April 2017
  • January 2017
  • December 2016
  • November 2016

Recent Posts

  • Apricot Chicken
  • Rice Noodles with Hoisin Meatballs
  • Chocolate Chip Puffs
  • Sour Cream Pound Cake with Lemon Glaze
  • Happy 2017 from Suzanne’s Table

Recent Comments

Jenna's avatarJenna on Day Nine- Suzanne’s Tabl…

Archives

  • November 2018
  • May 2017
  • April 2017
  • January 2017
  • December 2016
  • November 2016

Categories

  • Cooking
  • Home Cook
  • Uncategorized

Start a Blog at WordPress.com.

Privacy & Cookies: This site uses cookies. By continuing to use this website, you agree to their use.
To find out more, including how to control cookies, see here: Cookie Policy
  • Subscribe Subscribed
    • Suzanne's Table
    • Already have a WordPress.com account? Log in now.
    • Suzanne's Table
    • Subscribe Subscribed
    • Sign up
    • Log in
    • Report this content
    • View site in Reader
    • Manage subscriptions
    • Collapse this bar
 

Loading Comments...
 

    %d